I love how intense the colour in the sky became just minutes before the Sun rose above the horizon. I quickly moved my position to the waters edge and zoomed in to showcase the magnificent colours. In as quick as a flash they were gone.
When photographic on the beach, always wear a pair of wellies. You may look silly but you don’t have to worry about where you’re putting your feet.
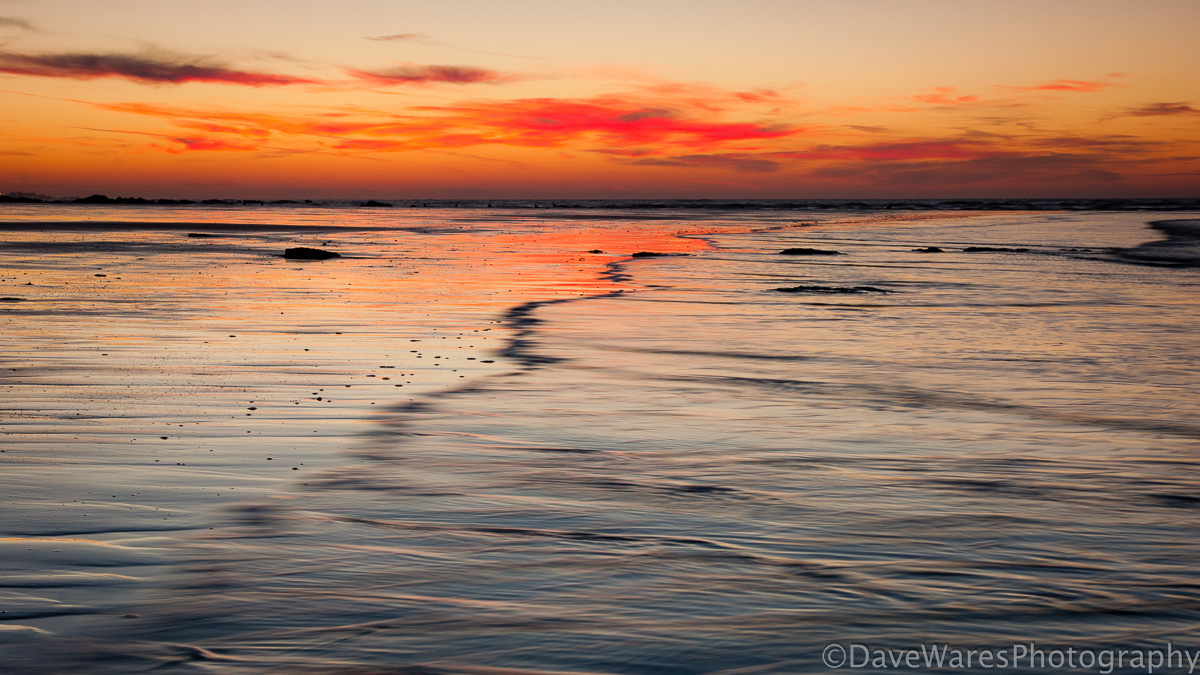
Yes, your truly managed to pull himself out of bed for another mornings shoot. This time I wanted to make some images at a stretch of beach between Hastings and Bexhill, having passed this beach many times on the train and seeing the large amount of rock exposed while the tide is out I had to make a visit. Once again the sky was too clear for my liking but this was not that much of a problem as there was more than enough going on in the foreground. I arrived at the beach while it was still dark to give me plenty of time to look for the best spot, and just as it was starting to get light I happened upon this area, where there was a nice mix of rock, sand ripples and water. Happy with my location I went about trying to find the best composition.
I was most pleased to find this patch where the sand and water seems to sweep around the bottom of the picture. I took this landscape version first then took the vertical shot (above). I like both versions but there is something about the vertical one that seems to connect the viewer to the scene even more, a greater sense of ‘being there’ perhaps. Maybe that’s just me though.
Having tried a few different compositions I headed out to the waters edge in an attempt to get some misty water action, but alas the tide (once again) was too calm. Due to the increase in light my exposures were rapidly getting shorter and by the time I found this group of rocks I was lucky if I got a couple of seconds at f22.
All of this happened before the sun had got over the horizon; in fact when it did rise the atmosphere had all but evaporated and I ended up tripping the shutter only a couple more times. Happy with my results I packed up and headed for home and a nice mug of coffee.
So it’s 5.30am Sunday morning and my alarm had just gone off. With one thing and another it has been quite a while since I’ve had the chance to get up early to do some photography, but today I’m making a concerted effort to get out there. The weather this past week has been absolutely superb and is due to continue for a few days more, so I wasn’t going to miss the opportunity to make the most of it. With camera bag all packed and ready to go I threw on some clothes, grabbed my hiking shoes and set off out.
‘iso200 50mm 4sec at f22’
Winchelsea beach is only about a 15-20 min drive from my house but even so, by the time I reached the car park it was already beginning to get light, though sunrise still was still some time to go. I grabbed my bag and tripod and quickly headed for the beach. Great, the tide was in and the waves were still gently lapping around the now rather worn wooden posts. This is one of those locations where you want the tide to be in if you want to get nice shots of water around the posts. It’s a great location when the tide is out too if long stretches of sandy beach is what you’re after.
I was a little worried about how the sky would look as there wasn’t a cloud to be seen, but there was just enough transition in colour to keep it interesting as long as I composed to have the horizon around a third down from the top. In fact this is what I wanted as my aim was to get some long exposures to try to turn the water misty and add more atmosphere to the already gorgeous colours. The exposures for the most part were around 4-6 seconds at either f16 orf22, so certainly long enough for the water to blur but the sea was just a little too calm for my liking and I didn’t get as much mist as I would’ve liked, larger waves would’ve done the job.
‘iso200 50mm 4sec at f22’
As you can see I did move around a bit trying slightly different compositions, and after about half an hour or so and being quite pleased with some of the results I packed up my gear and headed back towards Pett Level and the old WW2 pill box…
A while a go I decided to have a stab a creating a time lapse video. Please turn your sound on to hear the music.
This video is only my second attempt so there are a couple of faults with it, the main one being the spot of sensor dust. Darn these Dslrs!
Creating a time lapse movie is a relatively straight forward process, the main thing you’ll need though is a lot of patience. First of all there will be a small amount of maths that you’ll need to calculate before you set out. First is the intended length of your movie, I would suggest anything between 30-60 seconds. This may not sound a lot but things will become a bit tedious if longer than this, unless it’s something pretty spectacular. Next you need to determine the length of the event you will be shooting, for example in this movie I decided I wanted to capture half hour before and after sunrise, so an hour in total. Lastly (and this is optional but a good guideline to stick to) movies tend to be shot at around 24-25 frames per second, so this is the amount of photos you’ll need to take for every second of movie; so for example if you wanted a 30 second movie you would calculate 24×30=720. 720 will be the number of shots needed to create your 30 sec movie. Now you need to determine at what intervals you’ll need to take each photo, which is as follows: 3600 seconds ( an hour in seconds that I want to capture) divided by 720 shots =5 So you’ll need to take one shot every five seconds.
So again as a list:
24 shots multiplied by length of movie in seconds =total number of shot needed
Convert duration of event into seconds (e.g 1hour=3600 seconds)
Divide duration of event by number of shots needed to give the interval at which each shot should be taken.
Now, there are a couple of ways in which you can do this. One is to buy an intervalometer, a gizmo that plugs into the cable release socket on your camera ( if you have one). This is great as you can just program this with your shots per second and let it get on with it, time to put up your camping chair and get the flask of tea out. Second is the hard way and the way I had to do it (which is probably one of the reasons why I’ve left it so long to attempt another), and that is to do it manually with a remote shutter and a stopwatch. This will be the thing that puts most people off as it is really tedious, but the results can be well worth it I can assure you.
How you set the camera up will depend on the situation and a little trial and error will be needed, however I would recommend switching to full manual, that includes the focus and choosing a white balance too rather that having it on auto, that way all of the shots will have a consistent look. No need to shoot RAW either or at max size, this will make the process longer in post and take up an enormous amount of hard drive space. I would set the file size to small jpeg as even at this size your photos should still be large enough to make a HD movie at 1080p, and the smaller the file the more you can get on a single memory card. You don’t want to be swapping cards during a time lapse shoot.
Making the movie on the computer is not too difficult, you can use Quicktime pro or as I did using Windows Live movie maker or any number of other software out there. If using Windows Live Moviemaker, load in all of your images, highlight them all, then change the slide duration to 0.05 to give you a frame rate of around 24-25 seconds. Add sound, music captions as desired. I would recommend finding copyright free music to prevent any issues.
Hope you enjoyed my rather Heath Robinson attempt at time-lapse and hope my guide is half way understandable. If any one has more tips or suggestions, please leave a comment for others to see.